Thea Render in SketchUp: A Comprehensive Guide for Professional Designers
The world of architectural visualization has seen remarkable advancements, with tools and technologies continuously evolving to meet the demands of both professionals and enthusiasts. One such powerful tool is Thea Render, an advanced rendering engine known for its high-quality output and seamless integration with SketchUp.
Understanding Thea Render
Thea Render is a versatile and high-performance rendering engine that combines the power of both biased and unbiased rendering techniques. Developed by Altair, it is designed to produce photorealistic images with incredible detail and accuracy.
Thea Render's integration with SketchUp, a widely-used 3D modeling software, allows users to create stunning visualizations directly from their SketchUp projects.
Key Features of Thea Render
1. Photorealistic Rendering: Thea Render excels in creating realistic images by simulating real-world lighting and material properties. Its advanced algorithms ensure that light behaves naturally, producing accurate shadows, reflections, and refractions.
2. Interactive Rendering: One of Thea's standout features is its interactive rendering mode, allowing users to see changes in real-time. This immediate feedback loop is invaluable for tweaking materials, lighting, and camera settings without lengthy rendering times.
3. Versatile Materials: Thea Render offers an extensive material library and advanced material editor, enabling users to create complex textures and finishes. Materials can be customized with various properties, including reflection, refraction, transparency, and bump mapping.
4. Advanced Lighting: Thea supports various lighting techniques, including HDRI (High Dynamic Range Imaging) environments, IES (Illuminating Engineering Society) light profiles, and physical sun and sky models. These options provide users with the flexibility to replicate real-world lighting conditions accurately.
5. Network Rendering: For those requiring high computational power, Thea Render supports network rendering, allowing multiple machines to work together to reduce rendering times significantly.
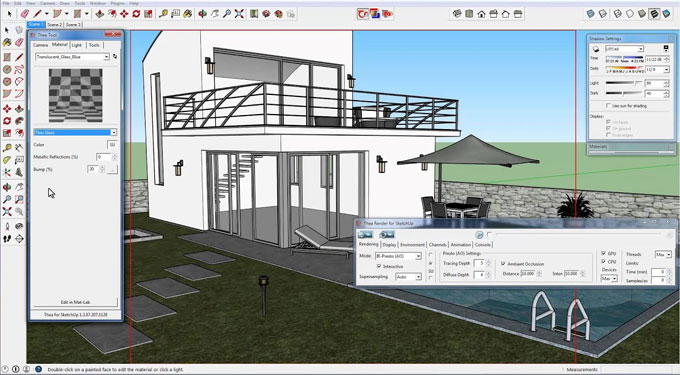
6. Integration with SketchUp: Thea's tight integration with SketchUp means that users can start rendering with minimal setup. The plugin provides a direct bridge between SketchUp's modeling environment and Thea's rendering capabilities.
Getting Started with Thea Render in SketchUp
Installation and Setup
To get started with Thea Render in SketchUp, you first need to download and install the Thea Render plugin for SketchUp. This process involves:
1. Downloading Thea Render: Visit the official Thea Render website and download the appropriate version of the plugin for your operating system.
2. Installing the Plugin: Follow the installation instructions provided by the installer. Once installed, Thea Render will be available as a toolbar within SketchUp.
3. Activation: Launch SketchUp, and you should see Thea Render in the menu. Activate your license using the credentials provided during purchase.
Basic Workflow
The basic workflow for rendering a SketchUp model with Thea Render involves several key steps:
1. Model Preparation: Ensure your SketchUp model is clean and organized. Proper grouping and layering can simplify the rendering process.
2. Assigning Materials: Use Thea's material editor to assign realistic materials to your model. Thea provides a comprehensive library, but you can also create custom materials.
3. Setting Up Lighting: Configure your scene's lighting using Thea's lighting tools. You can use HDRI maps for environmental lighting, add artificial lights, or rely on natural sunlight.
4. Camera Setup: Adjust your camera settings within SketchUp to frame your shot. Thea Render supports various camera effects, including depth of field and motion blur.
5. Rendering: Start the rendering process using Thea's interactive render mode for quick previews or the production render mode for high-quality final images.
6. Post-Processing: Utilize Thea's built-in post-processing tools to enhance your render. This includes adjustments to exposure, color balance, and other image properties.
Advanced Techniques and Tips
Enhancing Realism with Materials
Creating realistic materials is crucial for achieving photorealistic renders. Thea Render's material editor is powerful but can be complex. Here are some tips for mastering materials in Thea:
1. Use High-Quality Textures: Start with high-resolution textures to avoid pixelation. Websites like Poliigon and Textures.com offer excellent resources.
2. Layered Materials: Thea allows you to layer materials to create complex surfaces. For example, you can layer a reflective coating over a base material to simulate varnished wood.
3. Normal and Bump Maps: Utilize normal and bump maps to add surface detail without increasing polygon count. These maps simulate surface irregularities, enhancing realism.
4. Adjusting Material Properties: Fine-tune properties like roughness, glossiness, and reflection to match real-world materials. Conduct real-life observations to better understand how different surfaces interact with light.
Mastering Lighting Techniques
Lighting can make or break a render. Thea Render offers various tools to achieve realistic lighting:
1. HDRI Lighting: Use HDRI maps to create realistic environmental lighting. HDRI maps provide detailed light information, including color and intensity variations, resulting in natural-looking scenes.
2. Physical Sky: Thea's physical sky model simulates natural sunlight based on geographic location and time of day. This feature is perfect for architectural visualizations where natural light is crucial.
3. Artificial Lights: Thea supports different types of artificial lights, such as point lights, spotlights, and area lights. Use IES profiles for lights to replicate real-world light distribution patterns.
4. Light Portals: In interior scenes, use light portals to guide indirect light through openings like windows and doors. This technique reduces noise and improves render quality.
Optimizing Render Settings
Rendering can be time-consuming, but optimizing your settings can significantly reduce render times without sacrificing quality:
1. Adaptive Sampling: Thea's adaptive sampling intelligently allocates more samples to areas with high noise, improving render efficiency.
2. Denoising: Use Thea's denoising feature to remove noise from renders, allowing you to use fewer samples and reduce render times.
3. Bucket Rendering: For high-resolution renders, use bucket rendering to divide the image into smaller sections. This approach is more memory-efficient and allows for better control over render quality.
4. Render Channels: Utilize render channels to separate different aspects of your render, such as shadows, reflections, and depth. This separation allows for more precise post-processing.
Practical Applications of Thea Render in SketchUp
Architectural Visualization
Thea Render is extensively used in architectural visualization due to its ability to produce highly detailed and realistic images. Architects and designers can create compelling visualizations of their projects, showcasing materials, lighting, and overall design in a photorealistic manner. These visualizations help clients understand the design intent and make informed decisions.
Interior Design
Interior designers benefit from Thea Render's advanced material and lighting capabilities. Realistic renderings of interiors, complete with accurate textures and lighting, enable designers to present their concepts effectively. Thea's interactive rendering mode is particularly useful for experimenting with different design options in real-time.
To learn more, watch the following video tutorial.
Video Source: Thea Render
Product Design
Product designers can leverage Thea Render to create high-quality images of their designs. Whether it's consumer electronics, furniture, or automotive parts, Thea's ability to render fine details and complex materials ensures that the final images are both accurate and appealing.
Landscape Architecture
For landscape architects, Thea Render offers tools to visualize outdoor spaces realistically. The ability to simulate natural lighting conditions and render complex materials like vegetation, water, and terrain makes it an excellent choice for creating lifelike landscape visualizations.
Conclusion
Thea Render is a powerful tool that significantly enhances the rendering capabilities of SketchUp. Its ability to produce photorealistic images, combined with its ease of use and seamless integration with SketchUp, makes it an indispensable tool for professionals across various design disciplines. By mastering Thea Render's features and techniques, designers can elevate their work, creating stunning visualizations that communicate their ideas with clarity and impact.
Incorporating Thea Render into your SketchUp workflow opens up new possibilities for creativity and precision. Whether you're an architect, interior designer, product designer, or landscape architect, Thea Render equips you with the tools needed to bring your visions to life with unparalleled realism. As the field of 3D visualization continues to evolve, Thea Render stands out as a robust and versatile solution, ensuring that your designs are not only seen but truly experienced.