Exploring the Depths of SketchUp's Sandbox Tool

In the world of 3D modeling, SketchUp stands out for its user-friendly interface and versatility. While many are familiar with its basic drawing and modeling capabilities, few explore the depths of its more advanced features.
One such powerful yet underutilized feature is the Sandbox Tool. This toolset opens up a new realm of possibilities for designers, allowing them to create complex terrains, organic shapes, and detailed landscapes with ease.
The Sandbox Tool: An Overview
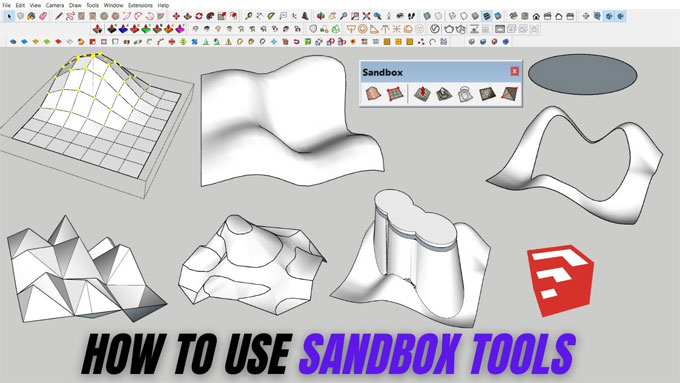
The Sandbox Tool in SketchUp is a suite of tools specifically designed for creating and modifying terrain. It includes several functions:
1. From Contours: Creates a surface from a series of contour lines.
2. From Scratch: Generates a grid that can be manipulated into various shapes.
3. Smoove: Allows for smooth modifications to terrain.
4. Stamp: Creates flat surfaces on terrains.
5. Drape: Projects edges from one plane onto a terrain.
6. Add Detail: Adds complexity to the mesh of a terrain.
7. Flip Edge: Adjusts the direction of triangulated faces for better terrain flow.
Why Use the Sandbox Tool?
The Sandbox Tool is not just for creating hills and valleys. Its applications extend to a variety of fields, making it a versatile addition to your SketchUp toolkit:
1. Architectural Visualization: Design realistic landscapes and integrate them seamlessly with your building models.
2. Urban Planning: Create detailed cityscapes and simulate real-world terrains for urban development projects.
3. Landscape Architecture: Design parks, gardens, and other green spaces with intricate topography.
4. Environmental Simulation: Model natural environments for ecological studies or disaster simulations.
5. Game Design: Build immersive and detailed terrains for game environments.
Getting Started with the Sandbox Tool
To begin using the Sandbox Tool, you need to activate it from the SketchUp toolbar:
1. Activate the Sandbox Toolbar: Go to View > Toolbars and check the Sandbox option. The Sandbox Toolset will appear in your toolbar.
2. Creating a Terrain from Contours:
a. Draw or import your contour lines.
b. Select all the contour lines.
c. Click on the 'From Contours' tool. SketchUp will generate a terrain surface based on the contours.
Practical Applications and Techniques
Creating Realistic Landscapes
One of the primary uses of the Sandbox Tool is to create realistic landscapes. By importing contour lines from a site survey or using geographic data, you can generate accurate terrain models. Here’s how you can do it:
1. Import Contour Data: If you have contour data from a survey, import it into SketchUp.
2. Generate Terrain: Use the 'From Contours' tool to create the terrain.
3. Refine the Surface: Use the 'Smoove' tool to make any necessary adjustments, ensuring the terrain looks natural.
Designing Urban Environments
For urban planners, the Sandbox Tool is invaluable. It allows for the creation of detailed urban terrains, facilitating better planning and visualization. Here’s a step-by-step guide:
1. Create a Base Terrain: Use the 'From Scratch' tool to generate a flat grid.
2. Sculpt the Terrain: Utilize the 'Smoove' tool to create elevation changes representing hills, valleys, or other landforms.
3. Add Urban Features: Use the 'Stamp' tool to create flat areas for buildings, roads, and other urban infrastructure.
4. Integrate Infrastructure: Use the 'Drape' tool to project road networks or other linear features onto the terrain.
Enhancing Landscape Designs
Landscape architects can take advantage of the Sandbox Tool to create intricate and dynamic garden designs. Here’s how you can enhance your landscape projects:
1. Initial Terrain Modeling: Start with the 'From Scratch' tool to create a basic grid.
2. Shape the Land: Use the 'Smoove' tool to form hills, slopes, and other land features.
3. Detailed Adjustments: The 'Add Detail' tool allows you to refine the terrain, adding more vertices and complexity.
4. Flat Surfaces for Features: Use the 'Stamp' tool to create level areas for patios, ponds, or playgrounds.
5. Pathways and Trails: The 'Drape' tool can project pathway designs onto the terrain, ensuring they follow the contours of the land.
Tips and Tricks for Mastering the Sandbox Tool
1. Use Real-World Data: Whenever possible, import real-world geographic data for accuracy.
2. Start Simple: Begin with basic shapes and gradually add detail. This approach makes it easier to manage complex terrains.
3. Experiment with Tools: Don’t be afraid to experiment with different tools in the Sandbox suite to see how they affect the terrain.
4. Combine with Other SketchUp Features: Use the Sandbox Tool in conjunction with other SketchUp features like groups, components, and layers to manage your model efficiently.
Case Studies: Real-World Applications
Eco-Friendly Residential Design
An architect working on an eco-friendly residential project used the Sandbox Tool to integrate the building with the natural landscape. By modeling the terrain accurately, they were able to position the house in a way that minimized site disturbance and took advantage of natural light and wind patterns.
Urban Park Development
A landscape architecture firm used the Sandbox Tool to design a new urban park. They created a detailed terrain model, including hills, valleys, and water features, which allowed them to visualize the park's layout and ensure accessibility for all visitors.
To learn more, watch the following video tutorial.
Video Source: TheSketchUpEssentials
Conclusion
The Sandbox Tool in SketchUp is a hidden powerhouse, offering immense potential for creating detailed and realistic terrains. Whether you are an architect, urban planner, landscape architect, or game designer, mastering this tool can elevate your projects to new heights.
By exploring its features and applications, you can harness the power of the Sandbox Tool to bring your creative visions to life. So, dive into the world of terrain modeling with SketchUp's Sandbox Tool and unlock a new dimension of design possibilities.