SketchUp Guide for Beginners

In case you're new to SketchUp, this article is an extraordinary spot to heat up your 3D modeling abilities. Here, you will discover a diagram of how to choose a format, move around the SketchUp interface, make a fundamental model, and save your model.
The first occasion when you use SketchUp, you have to sign in to initiate your preliminary or subscription. After you're marked in, the Welcome to SketchUp dialog box shows up, as appeared here.
This dialog box is your beginning stage for making a model and shows up each time you start SketchUp. Except, if you decide to turn it off in the SketchUp Preferences dialog box.
In the Welcome to SketchUp dialog box, you can do the following:
1. pick a format for your model
2. set the default layout
3. open late files
4. peruse for a current file
5. license a duplicate of SketchUp Pro
6. become familiar with SketchUp.
Choosing a layout: Each model in SketchUp depends on a format, which has predefined settings for your model's experience and units of measurement. At the point when you start another model, choosing a format with the right unit of measurement makes modeling simpler.
Here's the means by which to choose a format in the Welcome to SketchUp dialog box:
1. On the Files panel, which is chosen naturally in the left-hand sidebar, select one of the formats appeared, (for example, Architectural Inches or Woodworking Inches).
2. If you don't see the layout you need, select More Templates in the upper right. You see extra choices, as appeared in the accompanying figure.
a. The intense content portrays the kind of work for which the preset was made. The units show up beneath the style name. After you select a format, the modeling window shows up with your chosen layout applied.
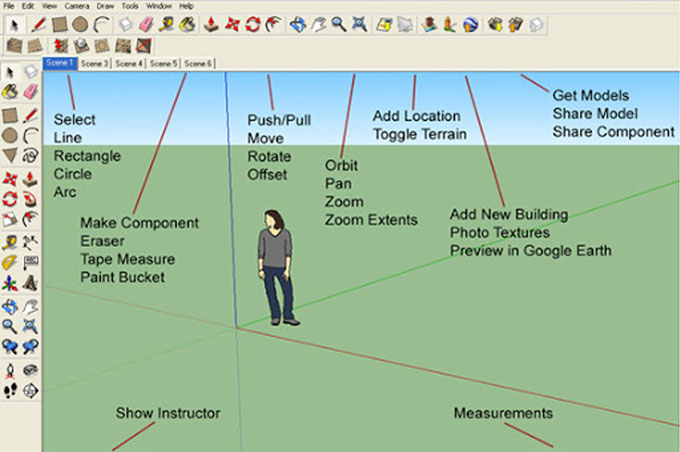
Understanding the SketchUp interface: When SketchUp opens, prepared for you to begin making a 3D model, you see a screen that incorporates the accompanying:
a. Title bar
b. Menu bar
c. Beginning toolbar
d. Drawing area
e. Status bar
f. Measurements box
g. Default panels
Making your first 3D model in SketchUp: On the off chance that you've never made a 3D model in SketchUp (or some other modeling program), the accompanying advances offer a brisk outline the nuts and bolts:
1. Select the individual, context-click the selection, and select Erase in the context menu that shows up.
2. In the Getting Started toolbar, select the Rectangle tool.
3. On the ground plane, in the space between the red and green axis, click the Rectangle tool cursor. At that point move your cursor to one side and click once more. A rectangle shows up on the ground.
4. On the Getting Started toolbar, select the Push/Pull tool, and place the Push/Pull cursor over the rectangle you just made.
5. Click and drag your rectangle up into a 3D shape. Watch out for the Measurements box and discharge the cursor when your shape is around 5 feet tall.
6. Without clicking or choosing anything, just sort 6' and press Enter. Notice how the stature of your shape changed to precisely 6 feet tall, and the worth you entered shows up in the Measurements box.
7. In the Getting Started toolbar, select the Orbit tool. Spot the Orbit cursor over your shape. At that point click and hold while you move the mouse down. Notice how the perspective on your shape changes, as appeared in the accompanying figure. Work on clicking and hauling with the Orbit tool as much as you can imagine.
8. In the Getting Started toolbar, click the Zoom Extents button. On the off chance that you orbit around until you forget about where you are in your model, the Zoom Extents button is a convenient method to reorient yourself.
9. On the off chance that you have a scroll-wheel mouse, scroll down to zoom out a piece. Working in SketchUp is a lot simpler with a scroll-wheel mouse. In any case, if your mouse does not have a scroll wheel, click the Zoom tool and you can zoom in and out that way, as well.
10. In the Getting Started toolbar, click the Paint Bucket tool.
11. In the Materials panel that shows up, select Colors starting from the drop menu, as appeared here. At that point select a shading from the alternatives that show up on the Select tab.
12. Click one side of your model with the Paint Bucket cursor to apply your chosen shading. Trial a piece with the various choices in the drop-down menu on the off chance that you like.
a. For instance, select Landscaping, Fencing, and Vegetation starting from the drop menu and apply rocks to your model. Select Tile starting from the drop menu and apply a tile design that you like. Orbit around and apply various materials to each side of your model.
Saving a model: To save your model, follow these means -
1. On the menu bar, select File > Save. On the off chance that this is the first occasion when you're sparing a model, the Save As dialog box shows up. To save a previously saved model with another name, select File > Save As.
2. Pick where you'd prefer to save your model. In the File Name box, type a name for your model. SketchUp model files end with the .skp file extension.
3. Click the Save button.