SketchUp for Retail Design: Visualizing Store Layouts
In the dynamic and competitive world of retail, the layout and design of a store can significantly impact customer experience and sales.
Retailers are constantly looking for ways to optimize their store layouts to improve customer flow, enhance the shopping experience, and maximize sales. SketchUp, a versatile 3D modeling software, has become a valuable tool for retail designers to create, visualize, and refine store layouts.
Understanding the Importance of Store Layout
The layout of a retail store is crucial for several reasons:
1. Customer Flow: A well-designed layout guides customers through the store, encouraging them to explore various sections and increasing the likelihood of purchases.
2. Product Placement: Strategic placement of products can enhance visibility and accessibility, promoting impulse buys and highlighting key items.
3. Aesthetic Appeal: A visually appealing store attracts customers and creates a positive shopping environment.
4. Efficiency: An optimized layout ensures efficient use of space, facilitating operations and reducing clutter.
SketchUp: A Powerful Tool for Retail Design
SketchUp offers a range of features that make it ideal for designing and visualizing retail store layouts:
1. Ease of Use: SketchUp’s intuitive interface allows designers to quickly create and modify 3D models without extensive training.
2. Precision: Designers can create accurate models with precise measurements, ensuring that every element fits perfectly within the space.
3. Visualization: With SketchUp, designers can create detailed 3D visualizations, providing a realistic view of the store layout.
4. Collaboration: SketchUp facilitates collaboration between designers, stakeholders, and clients through easy sharing and review of models.
Designing Store Layouts with SketchUp
Creating the Store Shell
The first step in designing a retail store layout in SketchUp is to create the basic structure or "shell" of the store. This includes the walls, floors, ceilings, and any fixed architectural elements. Here's how:
1. Importing Floor Plans: If you have existing floor plans, you can import them into SketchUp to use as a reference. This helps ensure accuracy and saves time.
2. Drawing Walls and Floors: Use SketchUp’s drawing tools to create walls, floors, and ceilings. The push/pull tool is particularly useful for extruding walls to the correct height.
3. Adding Doors and Windows: Insert doors and windows using SketchUp’s component library or create custom components to match the store's specifications.
Fixture Placement
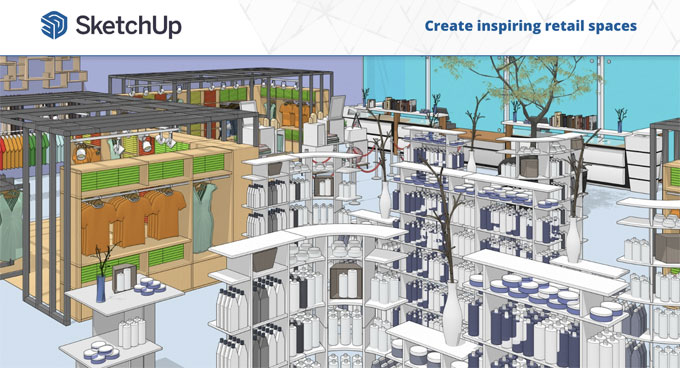
Once the basic structure is in place, the next step is to add fixtures. Fixtures include shelves, racks, display tables, and any other elements used to display products. Proper fixture placement is essential for maximizing product visibility and ensuring a smooth customer flow.
1. Using Pre-Made Components: SketchUp’s 3D Warehouse offers a vast library of pre-made components, including various retail fixtures. You can search for and import these components directly into your model.
2. Custom Fixtures: If you have specific fixture designs, you can create custom components in SketchUp. This allows for unique and tailored fixture designs that match the brand’s aesthetic.
3. Placement and Arrangement: Use the move, rotate, and scale tools to place and arrange fixtures within the store. Consider the height, width, and accessibility of each fixture to ensure an optimal layout.
Visualizing Customer Flow
Customer flow refers to the path customers take as they navigate through the store. Effective customer flow design can enhance the shopping experience and increase sales by encouraging customers to explore different sections of the store.
1. Pathways and Aisles: Create pathways and aisles that guide customers through the store. Ensure that aisles are wide enough for comfortable movement and that pathways lead to key areas.
2. Zoning: Divide the store into different zones based on product categories or themes. Use SketchUp to visualize these zones and ensure that they are logically arranged.
3. Focal Points: Identify and create focal points, such as promotional displays or feature areas, to attract customer attention. Use lighting and signage to highlight these areas in your SketchUp model.
Enhancing Store Visualization
One of the significant advantages of using SketchUp for retail design is the ability to create detailed and realistic visualizations. These visualizations help stakeholders understand the design and make informed decisions.
Adding Details and Textures
1. Textures and Materials: Apply textures and materials to surfaces using SketchUp’s paint bucket tool. This includes floor finishes, wall colors, and fixture materials. Use high-quality textures for a realistic look.
2. Lighting: Add lighting elements to your model to simulate natural and artificial light. This helps in visualizing how the store will look under different lighting conditions.
3. Signage and Branding: Incorporate signage and branding elements, such as logos, banners, and posters, into your model. This adds a layer of realism and helps in visualizing the store’s branding.
Creating Walkthroughs and Renderings
1. Walkthroughs: SketchUp allows you to create walkthrough animations that simulate a customer’s journey through the store. This provides a dynamic view of the layout and helps in identifying potential issues with customer flow.
2. Renderings: Use rendering extensions like V-Ray or Enscape to create photorealistic images of your store design. Renderings highlight the details and aesthetics of the design, making it easier to communicate with stakeholders.
Collaborating and Iterating
Designing a retail store layout is often a collaborative process involving multiple stakeholders, including designers, architects, and store managers. SketchUp facilitates collaboration and iteration through several features:
1. Model Sharing: Share your SketchUp models with team members and clients via cloud storage or the 3D Warehouse. This allows for easy access and review.
2. Feedback and Revisions: Collect feedback from stakeholders and make necessary revisions to the model. SketchUp’s flexibility makes it easy to implement changes and refine the design.
3. Presentation: Use SketchUp’s presentation tools to create compelling presentations that showcase the store design. This includes creating scenes, animations, and exporting high-quality images.
To learn more, watch the following video tutorial.
Video Source: bernhard.design
Conclusion
SketchUp is a powerful tool for designing and visualizing retail store layouts. Its ease of use, precision, and visualization capabilities make it an ideal choice for retail designers looking to create optimized and visually appealing store layouts.
By using SketchUp, designers can ensure effective fixture placement, enhance customer flow, and create detailed visualizations that facilitate collaboration and decision-making. Whether designing a boutique clothing store or a large electronics retailer, SketchUp provides the tools needed to bring retail design concepts to life.