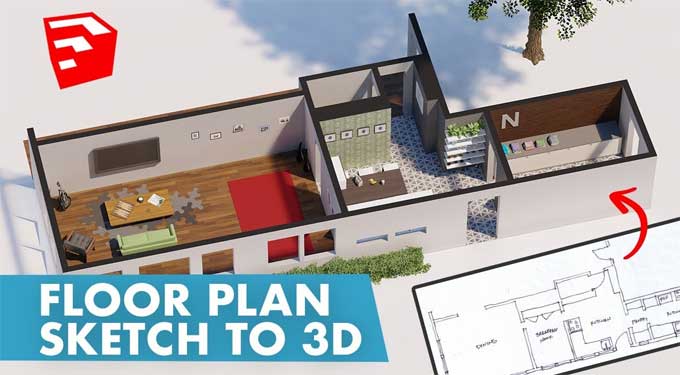
How to Convert a Floor Plan to 3D Using SketchUp
How to import File?
You can either download the image or use your own drawing in place of the image. Choosing the image you would like to use is as simple as selecting it and clicking on 'file' > 'import'. The 'use image as' options must be set to 'image' when you select the 'use image as' option. Once you have clicked the 'import' button, you will be able to view the results.
How to Scale Image?
When you use one of your images, you can scale the image according to the measurement you know about it. If the doors are not 36 inches wide, then we can assume that they are 36 inches wide. On one side of the wall, select the tape measure tool and click it from side to side until you reach the end of the wall. Upon typing 36", press the 'enter' key on your keyboard.
How to lock your Image?
It is recommended that you lock the image if you do not want it to move. In order to create a group of images, you just need to double-click the image, then right-click it to make the group. You can select the lock by right-clicking it again and selecting the lock option.
Modeling a floor plan into a 3D Model
The Floor Drawing
If you start at the reference point on the floor, you can trace the floor using the line tool. The measurements you have for each line should be typed in if you have exact measurements. If you are drawing something without measurements, then you will want to use the line tool to draw a line, and if possible, round it up to the nearest inch or foot if that is possible. Holding shift while you click your reference point on the axis will make it easier for you to close off the last corner.
Painting
If you right-click on the original image and select unlock, you will be able to unlock the original image. The paint bucket tool can be opened by pressing the B key on your keyboard. After that, hold down alt while you click the eye dropper and click the original image while holding down alt at the same time. It is now possible to paint the floor group that you just drew in the previous step. Due to the fact that your floor already contains all the details of the original image, you can now delete the original image.
Creating Slab Floor
In your sketch, you will first need to make the slab floor in order to get started. With the push/pull tool, you can extrude it down 8 inches by clicking on the floor and then extruding it down.
Drawing Wall
There are two types of wall in a floor plan, which are
• Interior Wall
• Exterior Wall
Interior Wall
It is possible to trace the outline of the interior walls in the same manner as one would trace the floor outline. In case you are not certain of the exact measurements, you should use whole numbers instead.
Exterior Wall
Copy the floor, exit the group, and then click the 'edit' button, and then choose the 'paste in place' option. It is possible to offset the exterior walls using the floor by using the offset tool, type in seven to offset the exterior walls.
Increment changing
It may be helpful for you to adjust the increment settings in your user interface if you find that your measurements are rounded to whole numbers. When you select "window" > "model info," the "units" tab will appear. You can then choose 0 in the "precision" drop-down menu after clicking on the "units" tab.
Close Line
Turning off every line as you go along is a good idea. With the Edge Tools2 plug-in by Thom-Thom, this can be made much easier. Using the 'edge tools' option of 'tools' > 'find edge gaps', you will be able to quickly locate any gaps in the drawing.
Extrude Wall
It will be very easy to extrude your walls once you have drawn them in the correct order by using the push or pull tool. It is good practice to use 8 feet as a guideline if you are not sure how high the walls are.
Using the push or pull tool to type in 8, you can click on your walls and choose the push or pull tool to enter 8. The push or pull tool can be used to make all your walls the same height by clicking twice on them.
Adding Door Frame
It is commonly accepted that a door frame should be 6' 8" tall. On the base of your door frame, you should write 6' 8" on the bottom of the frame that you are currently using. Using the eraser tool, you can erase any extra lines that may appear after copying and extruding the shape from 6' 8" up and following it along the wall's width.
It is necessary to copy and extrude the shape to the other side of the door frame. Once you have copied the header shape, you can paste it on all the door frames, and remove any extra lines you have. You can also remove any extra lines you have with the push or pull tools.
Changing the View
You can view the content from the top-down again by going to camera > standard views > top. In the camera dropdown menu, you will find an option to select "parallel projection". The imported sketch needs to be unhidden in order to be visible.
Addition of Windows
In order to complete the conversion to 3D, the windows will need to be added. It should be noted that when you view the parallel projection view, you will no longer be able to see the window openings. As a solution, you can bring the sketch to the top of the screen or decrease the opacity of the sketch. In addition to leaving the sketch below your model, it is also possible to leave it above. All of the walls of the room can be changed in terms of their opacity.
To learn more, watch the following video tutorial.
Video Source: Designer Hacks
Selecting the top of the walls
From the default tray, select the materials tab and click on it. The dropdown menu allows you to select your favorite colors. Using the paint bucket, paint the tops of the walls with the color of your choice in the color of your choice. On the materials tab of the application, you can use the opacity slider to reduce the opacity.
Paint buckets can be used to paint the bottom of walls and lower the opacity of them by using the paint bucket tool. As a result, the plan should now be displayed underneath your model. Trace the edge of the windows using the line as a guide, and then copy and paste them along the wall so that they all appear the same size.
From the 3D view
In order to determine the height of the sill on the window, you draw a line across the bottom of the window. You can erase the lines that appear at the bottom of the screen by using the eraser tool. The windows can either be pushed or pulled through an opening if you are interested in creating a window opening.
Putting in the final details
By adding doors, windows, appliances, and other items to your finalized floor plan, an interactive 3D model can now be created from it. The 3D Warehouse can be used with your models in order to use them with the 3D Warehouse.