How to Create Scenes in SketchUp

Hey folks, today, we will talk about how to make a scene in SketchUp. Wait, that sounds wrong!
In SketchUp, making a scene doesn't upset anyone. Truth be told, scenes assist you with sparing diverse model views and properties and afterward present those views to others.
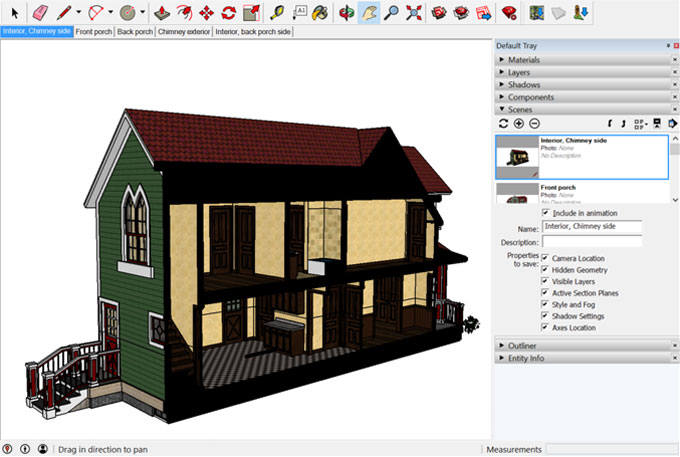
At the point when you make a scene, a tab shows up at the head of the drawing territory, so you can just click the tab to show the saved view. In the accompanying figure, you can perceive how a few views of the Victorian-style house are saved as scenes, with tabs along the head of the drawing region.
Why scenes are pretty handy
As you're making a 3D model, make scenes with the goal that you can rapidly move among various views of your model. You may save views from various edges, similar to the front, back, and side of your model. Or on the other hand you may make scenes so you can rapidly move among various delivering styles, for example, wireframe, monochrome, or finished.
Save scenes to oblige an introduction of your model. Rather than stopping your introduction to circle, dish, and zoom while your crowd watches and pauses, you can make every one of these moves before your introduction by sparing a scene of each view that you need to show. During your introduction, you simply need to click the scene tabs.
Save scenes with a model that you share through the 3D Warehouse. Vivify a grouping of scenes to flaunt a model. Figure out how to invigorate scenes in Animating Sections and Scenes.
In the areas that follow, you discover how to add a scene and control what properties you save with that scene. On the off chance that you need to save changes that you cause to a ruckus, you can do as such by refreshing the scene. SketchUp additionally has orders for sequencing scenes and erasing scenes that you do not require anymore.
Adding a scene
Before you make a scene, set the view and apply any styles, haze, shadows, or segment slices that you need to the scene to show. Additionally, conceal any calculation or deselect any layers that you don't need the view to show. Every one of these properties are saved with your scene, despite the fact that you can refresh or deal with these properties later, as clarified in the following two segments of this article.
To add a scene, follow these means:
1. Select Window > Scenes to open the Scenes discourse. Open the Scenes exchange in the Default Tray.
2. Click the Add Scene icon. The scene shows up in the Scenes discourse with the default name of Scene 1.
3. (Discretionary) Click the Show Details icon in the upper right of the Scenes discourse. Utilize the alternatives gave to rename the scene (as appeared in the accompanying figure), add a portrayal, and select which properties are saved with the scene. The following area, managing properties saved with a scene, clarifies how the properties choices work.
Refreshing a scene
Refreshing a scene saves any progressions that you make to a scene after you make it. To refresh a scene, follow these means:
1. Select Window > Scenes to open the Scenes discourse. Open the Scenes exchange in the Default Tray.
2. In the Scenes discourse, select the scene you need to refresh.
3. Click the Show Details icon () and ensure all the properties you need to save with the scene are chosen.
4. Click the Update Scene icon () in the upper left of the Scenes discourse.
In the Scene Update discourse box that shows up, you can deselect any properties you would prefer not to save with the update. Recollect that if a thing wasn't chosen in Step 3, that property doesn't save, regardless of whether you select it in the Scene Update exchange box. After you're finished choosing or deselecting properties, click Update.
Note: If you don't care for keeping the Scenes discourse open, you may want to refresh a scene by setting clicking a scene's tab and choosing Update. In the Scenes exchange, you can likewise click the Details bolt and select Update Scene.
Viewing scenes in imported models
On the off chance that you download a model from the 3D Warehouse into SketchUp, your download is embedded into your model as a segment. In any case, segments don't have scenes.
Note: To see and access the scenes, you should open the model in another example of SketchUp, so it opens as a full model as opposed to as a part in a model.
To open a 3D Warehouse download as a model, click No when a message asks, "Burden this straightforwardly into your SketchUp model?" You at that point see another message that asks, "Would you like to open or save this record?" Click Open and you can see and utilize any scenes saved with the model.