How to Create a Floor Plan with SketchUp
Importance of creating a floor plan by using SketchUp Software
The SketchUp software is one of the greatest tools for creating a complete floor plan. Designing the floor plan using SketchUp software offers numerous advantages for the architects and designers, which are as follows:
Reducing the chances of rework
The SketchUp software helps to save time and money for the user by solving the construction challenges in 3D. The users can visualise the project site conditions, building systems and the structural connections, which helps to reduce the chances of rework.
Exploring the design project before building
The SketchUp software helps to share a link to view the design models in any browser, along with the virtual walkthroughs. In addition, this 3D modelling software also helps to detect the project clashes, which help the owners to evaluate the floor plans.
Getting a fast 3D design model
With the help of the most intuitive and easy-to-use 3D design features of the SketchUp software, the designers can create a 3D design plan within a short time.
Sparking new design ideas
The SketchUp software also helps to explore and find the perfect design workflow for the construction project.
Creating constructable drawings
The SketchUp software helps to draw plans, sections, elevations and other building details that are required to create the floor plan.
Import and export designs easily
The SketchUp software enables designers to easily access the design works along with other project team members by taking advantage of a variety of file formats.
Discuss the process of creating a floor plan within the SketchUp software
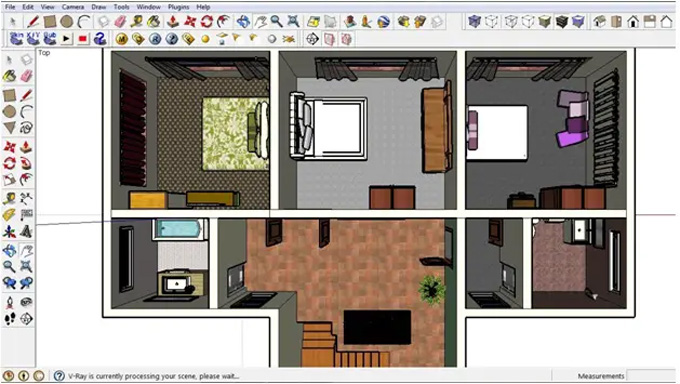
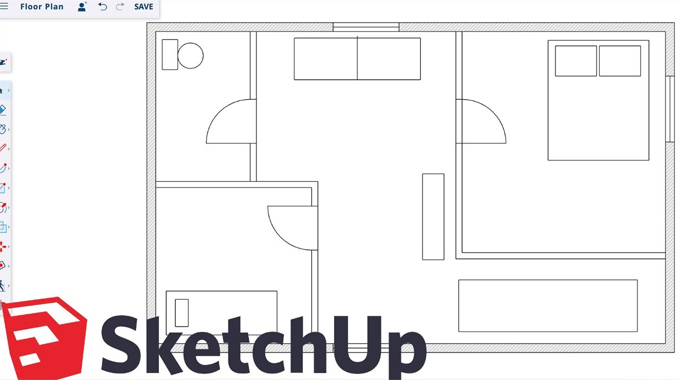
There are numerous tools offered by the SketchUp software, including the Line tool, Rectangle tool, Push/Pull tool, Offset tool, and the Tape Measure tool helps to achieve a detailed floor plan. The layers enable the users to organise the different design elements of the floor plan, for example, doors, walls, windows and furniture, which helps to edit the design. On the other hand, the groups help to combine multiple design entities into a single object. The “Architectural Design – Feet and Inches” template of the SketchUp software is one of the good options to design the floor plan. The users can also change the units of the floor plan. For creating a detailed floor plan by using the SketchUp software, the users have to follow several steps, which are as follows:
Drawing the walls
To initiate the floor plan, the floor foundation has been designed by drawing the walls. In this context, the user has to grab the Rectangle tool of the SketchUp software and click on the origin point. After that, the user has to drag the cursor to create a rectangle, which helps to represent the outer dimensions of the building. After drawing the rectangle, the Tape Measure tool has been used to define the exact length and width of the walls.
In this context, the user has to click on one edge of the rectangle, has to drag the tape measure along the edge and then has to type in the desired length. After that, the Line tool has been used to trace over the guidelines and help to create precise walls. The offset tool has been used to add the thickness of the wall. The Push/Pull tool has also been used to extrude the walls upwards, which helps to give the wall heights.
Creating the floor plan and adding windows and doors
The windows and doors are another important element of the floor plan, as it helps to provide access to light and ventilation. The Tape Measure tool of the SketchUp software has been used to mark the location of the door opening on the wall. After that, the Rectangle tool was used to draw a rectangle, which helps to represent the door or window opening. In the next step, the Push/Pull tool has been used to push the face through the wall, which helps to create the opening.
The online library of the SketchUp software offers numerous pre-made design models of doors, windows, furniture, and other components that can be used in the floor plans. The user can import a door or window from the 3D Warehouse of the SketchUp software by searching for “door” or “window” in the search bar and selecting the door or window model as per their design requirements.
Adding details to the floor plan
After adding windows and doors in the floor plan, the user can also add the final details and finishing touches to the floor plan. In this context, the 3D Warehouse of the SketchUp software has acted as a great resource for finding pre-made design models of appliances, furniture, and other household items.
With the help of the SketchUp software, the user can also add details, for example, wall finishes, flooring and lighting features in the floor plan. Thus, the users can create a complete and realistic representation of the floor plan.
To learn more, watch the following video tutorial.
Video Source: UpSketch
Download SketchUp Floor Plan
Exporting the floor plan
The SketchUp software allows users to export their floor plans in a variety of formats, such as PDF, PNG, JPG, and DWG. In this context, the user has to go to the file option, then click on the export option and has to select the desired file format of the floor plan. After exporting the floor plan, it can also be shared with clients or contractors.