Ways to view SketchUp Model in ArcGIS Urban
Three-dimensional models are vital as it helps to envision what new changes and development could look like in the future. It has become a prerequisite to using the models to get a better picture of what changes and development are there to come in the distant future.
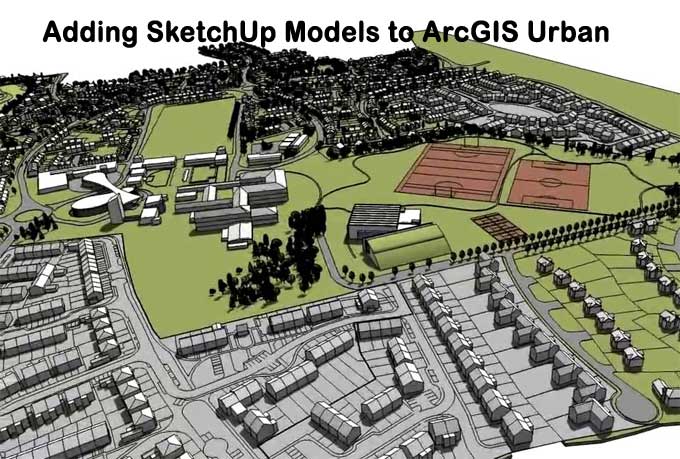
By using ArcGIS Urban, we are able to upload 3D models to view various project use cases for a better understanding of the natural world impacts of the potential developments. The requirement of a scene of a project will show as a closer to reality image and not just abstract drawings.
In this article, the steps for exporting the SketchUp models and then importing the model into ArcGIS Pro, sharing the work into ArcGIS online, and lastly publishing the model as a Framework to an ArcGIS Urban Project.
Exporting from SketchUp
The first step will be to export the SketchUp model into a format that can be imported into ArcGIS Pro.
1. Opening up the SketchUp Model.
2. Select the full model (by dragging a box from right to left), and Right Click the model.
3. Choose Make Component and Name it.
4. Select Replace selection with component and click Create.
Once we have a model that has one feature, let's add the geolocation, which will be helpful later when we place the model in Pro.
1. Click File and then Geo-location, then Add Location.
2. In the Geo-locate wizard, we can plug in the address or area where your model is located (this can be a general location; we can move it later in Pro).
3. After selecting the provider, click on Import. In the Import window, select Digital Globe as the provider.
4. Once the geolocation is added, go to File, select Export, then select 3D Model.
5. Select a location to save your file. Make sure it is saved as a Google Earth File (.kmz).
Importing the file into ArcGIS Pro
The SketchUp model can now be imported into ArcGIS Pro.
1. Select a new Local Scene in an ArcGIS Pro project.
2. After that, go into Add Data and enter the KML layer.
3. On the Analysis Tab, click the Toolbox button.
4. On the right side, it should have opened a Geoprocessing tab. Search for the KML to Layer button under that tab.
5. Select the KML file, and give it a name before pressing Run.
This poses an exciting challenge. Sometimes when we do this, it will result in the model intersecting or being entirely below the elevation. In this step, we'll fix that so that it can be uploaded to ArcGIS Online later.
6. First, right-click the new Multipatch model and then go to Preferences.
7. Select Elevation and change it from At an Absolute Height to On the Ground.
In order to save our model's current elevation as an Absolute Height, you must re-export the Multipatch model as shown below. ArcGIS Online only accepts elevations that are set as Absolute Height.
8. Go to your Geoprocessing tools and search for Layer 3D to Feature Class as soon as we have changed our elevation multipatch.
9. Then, after giving an input, give the patch a name and press Run.
By using the new model in ArcGIS Pro, we are now able to publish the data to ArcGIS Online.
1. To share a Multipatch Feature Layer as a Web Layer, right-click it and select Sharing from the menu.
2. Provide the Item with a Name, Summary, and a few Tags. Choose a Folder to save it to (Optional), and share it with everyone.
3. Then press on the publish option.
To learn more, watch the following video tutorial.
Video Source: Esri Saudi Arabia
Viewing your Model in ArcGIS Online
Now that the model is hosted on ArcGIS Online as a Scene Layer, we can now explore it.
1. We need to sign in to our ArcGIS Online organization.
2. Navigate to the uploaded Scene Layer in the Contents.
3. Open the Scene Layer by clicking on the thumbnail.
Adding the Model into ArcGIS Urban
We are now able to view the multipatch model with the surrounding context using ArcGIS Urban.
To add it into our Project:
1. To open an existing project in the ArcGIS Urban Model, click Open or New.
2. Click on the Configure Scenarios button in the Project Editor.
3. In the Design Visualization window, select the layer that is uploaded for the scenario and click OK.
4. Click OK again to return to the Urban view.
To add it into our Plan:
1. Create a new plan or open your existing plan in the ArcGIS Urban Model.
2. Click the Configure Scenario button once we are in the Plan Editor.
3. In the Design Visualization window, select the layer that is uploaded for the scenario and click OK.
4. Click OK again to return to the Urban view.
Those were all the steps and processes, and now the final outcome of the model can be shown in a real-life setting as it was intended to become.