Windows Builder SketchUp Plugin – Full Guide, Features & Download

The Windows Builder plugin helps to create different types of windows or door types as components of any shape. The Windows Builder plugin is composed of SWT Designer and Swing Designer, which help to make it easy to create Java GUI applications, thus saving lots of time writing code.
The designer and layout tools of the Windows Builder plugin enable users to create simple forms and complex windows. Users are also able to change the various properties of controls by using the property editor option of this SketchUp plugin. The Windows Builder plugin can build an abstract syntax tree, which helps to navigate the source code and uses GEF to manage and display the visual presentation.
Discuss the main design features of the Windows Builder SketchUp Plugin
The design features offered by the Windows Builder plugin are as follows:
Creating a parameter-driven window
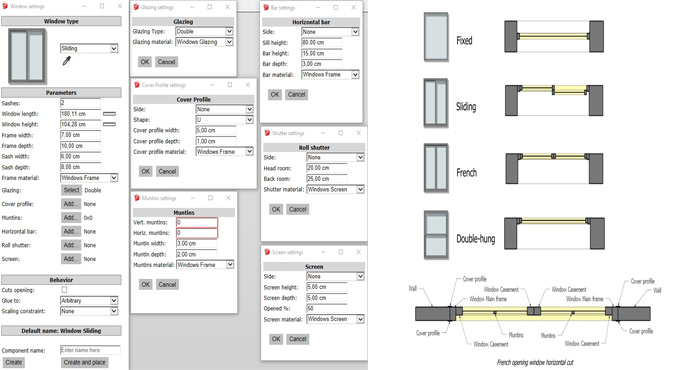
The Windows Builder plugin enables users to define all design parameters, for example, sill depth, height, width, the thickness of the frames, the opening styles and others, which give full control over how each and every window appears.
Placing frames and glazing
The Windows Builder plugin helps to generate accurate frames and glazing elements on the basis of the settings instead of building each design component manually.
Batch placement and grid support feature
In the case of repetitive building designs, the user can place multiple windows in a row along with consistent spacing and alignment.
Providing clean and predictable geometry
The output of the Windows Builder plugin is clean geometry, which helps to integrate well with the other modelling operations, rendering workflows and documentation procedures.
Beginner-friendly user interface
The user interface, its intuitive controls and clear design parameters of the Windows Builder plugin are simple and easy, which makes it easily adaptable by new users.
Process of using the Windows Builder SketchUp Plugin
For using the Windows Builder plugin, the users have to follow several steps, which are as follows:
1. At first, the users have to select the wall surface where they want the window.
2. In the next step, the user has to open the Windows Builder tool from the Extensions menu or toolbar.
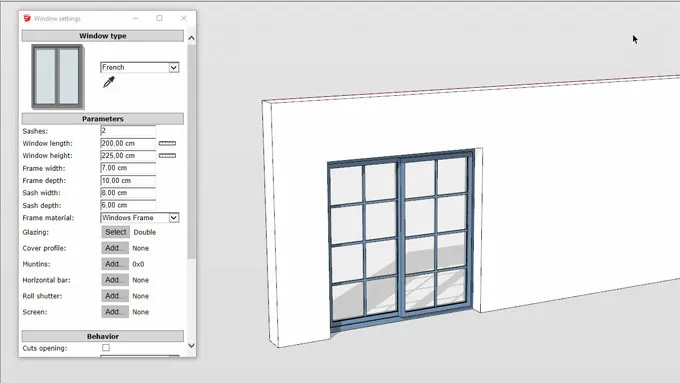
3. The users have to set the desired width, font type, height and other parameters of the windows.
4. In the next step, the user has to choose the placement points on the wall surface.
5. At the final stage, the user has to confirm the settings to generate the window geometry on the SketchUp software.
Importance of the Windows Builder SketchUp Plugin in the design sector
The Windows Builder plugin enables users to generate window openings directly on the design wall surface, thus frames, sills, glazing and other designs can be inserted automatically as per the design's settings. With the help of the Windows Builder plugin, users are allowed to adjust the dimensions, positions and styles of the windows without requiring any heavy manual editing. In addition, the Windows Builder plugin also helps to support rapid placement across multiple walls and is appropriate for repetitive architectural workflows.
This SketchUp plugin enables users to create consistent window openings along with precise dimensions. With the help of this SketchUp plugin, users can also insert built-in window frames and sash models. Users can also apply uniform spacing throughout the wall grids. Users can also customise the window styles with the help of the Windows Builder plugin before the insertion process. The Windows Builder plugin also helps to speed up the repetitive facade tasks, as well as ensure the higher modelling accuracy of the documentation procedure.
How to download the Windows Builder SketchUp Plugin for the SketchUp software
To download the Windows Builder plugin for the SketchUp software, several steps need to be followed, which are as follows:
1. At first, the user has to visit the SketchUp Extension Warehouse and search for the “Windows Builder” plugin.
2. After that, the users have to look for the extension titled "Windows Builder" by developer D.Bur.
3. In the next step, the user has to click on the install button on the plugin’s page, which helps to download and install this SketchUp plugin directly into the SketchUp software.
To learn more, watch the following video tutorial.
Video Source: Deepak Verma CAD Softwares
Download Windows Builder SketchUp Plugin
4. After completing the installation process of the Windows Builder plugin, this plugin will appear in the tools menu, which enables users to create windows along with various design options.